Unraid to Ubiquiti UniFi UNAS Pro Migration Plan (NFS + Cache Evacuation)

Introduction
This runbook documents the architecture, preparation, and step-by-step execution for migrating a multi-terabyte Plex media library from an Unraid server (10.0.0.10) to a dedicated Ubiquiti UniFi UNAS Pro appliance ("UNAS-Pro" - 10.0.0.20) interconnected over a 10GbE SFP+ link.
Why This Migration Exists
- Storage Tiering & Decoupling: Separates latency-sensitive application databases (
appdata, Docker runtimes, SQLite databases) on Unraid's local NVMe/SSD cache pool from cold/bulk media, offloading multi-terabyte sequential storage to a dedicated 7-bay RAID 6 pool (~90TB usable). - Hardware Refresh & Drive Replacement: Safely evacuates existing mechanical drives inside an external USB4 DAS enclosure, allowing them to be detached via Unraid's New Config tool and replaced with new, higher-capacity drives without risking data loss.
- Zero Metadata Loss: Ensures Plex, Sonarr, Radarr, and Jellyfin maintain their watch states, posters, and library indexes by carefully preserving container pathing and leveraging high-performance NFSv4.2 mounts with
no_root_squash. - Repeatable Runbook & Safety Net: Provides a structured, verified blueprint with pre-flight tests, parallel-safe rsync commands, background session management, and explicit rollback instructions.
1. Architecture & Strategy Overview
- Appdata & System: Kept locally on Unraid (
10.0.0.10) on the fast SSD/NVMe Cache Pool. - Bulk Data & Media: Moved to the UniFi UNAS Pro ("UNAS-Pro" - 10.0.0.20, 7x18TB) mounted over NFS at
/mnt/remotes/nas_plex. - USB4 DAS Drives: Evacuated, detached via New Config, and replaced with new drives.
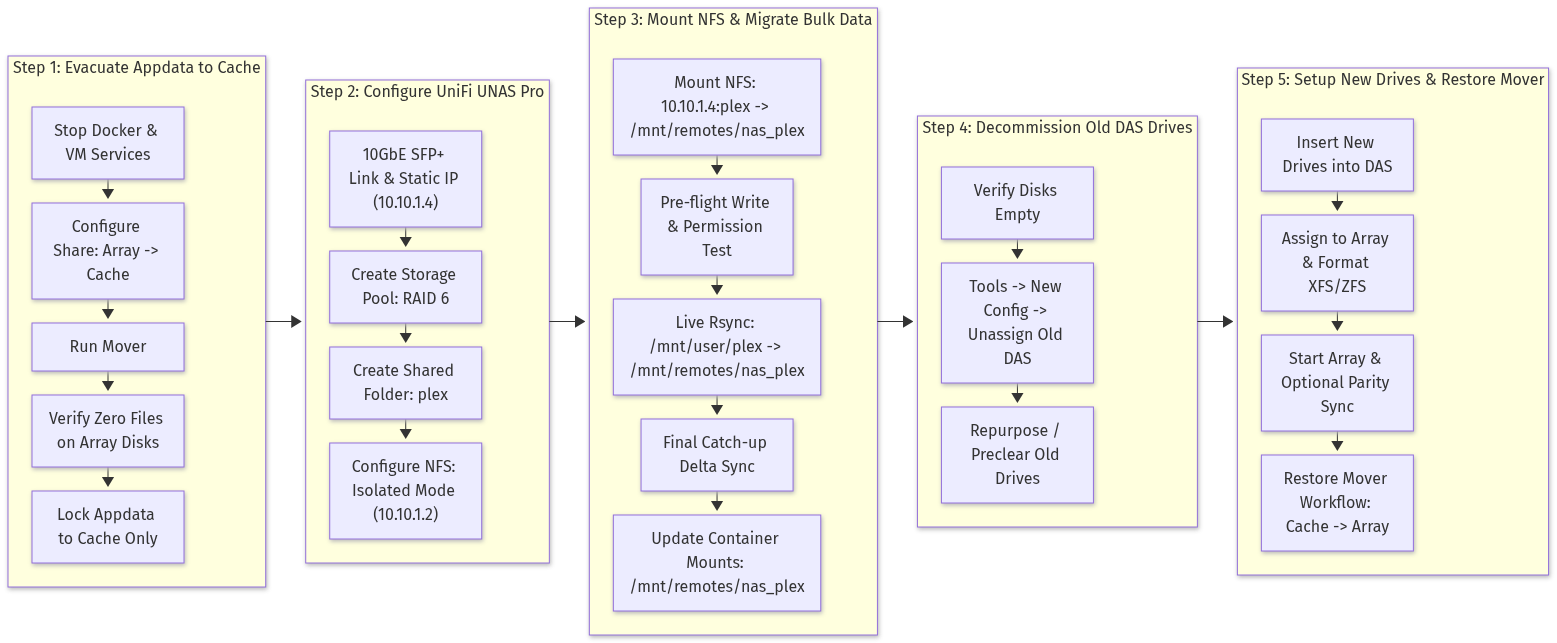
2. Pre-Requisites Checklist
On Ubiquiti UniFi UNAS Pro (UNAS-Pro - 10.0.0.20)
- [ ] 7x 18TB drives inserted and seated properly.
- [ ] High-speed networking connected (10GbE SFP+ DAC or 10G optical/RJ45 module).
- [ ] Static IP assigned:
10.0.0.20(or fixed DHCP reservation in UniFi Network). - [ ] UniFi OS & UniFi Drive updated to current stable release.
On Unraid Host (10.0.0.10)
- [ ] Plugins installed: Unassigned Devices and Unassigned Devices Plus (for remote NFS mounts).
- [ ] Plugin/Tool installed: User Scripts (for automated mounts/background jobs).
- [ ] Cache Pool capacity verified (sufficient free space to hold all
appdataandsystem/docker.img). - [ ] Backup created of
appdata(using the Appdata.Backup plugin or a manual tarball). - [ ] Plex Safety Setting: In Plex Web -> Settings -> Library, uncheck "Empty trash automatically after every scan" (prevents loss of metadata, intros, and watch history if storage disconnects).
3. Step-by-Step Execution Plan
Phase 1: Evacuate Appdata & System from DAS Drives onto Cache
[!IMPORTANT]
Unraid's Mover cannot move open files. If Docker or VMs are active, database files (SQLite) anddocker.imgwill be locked and Mover will silently skip them.
1. Stop Docker and VM Services
- Navigate to Settings -> Docker -> Set Enable Docker to
No-> Click Apply. - Navigate to Settings -> VM Manager -> Set Enable VMs to
No-> Click Apply.
2. Configure Mover Direction for Appdata & System
- Go to Shares -> Click appdata:
- Primary storage:
cache - Secondary storage:
Array - Mover action:
Array -> Cache - Click Apply.
- Primary storage:
- Repeat the exact same settings for the
systemshare (anddomainsif you run VMs).
3. Run Mover & Monitor
- Go to the Main tab and click Move (under Array Operations).
Or monitor directly via SSH/Terminal:
mover start
tail -f /var/log/syslog | grep -i mover
4. Verify Zero Appdata Remains on the DAS Disks
Run the following in the Unraid terminal:
ls -la /mnt/disk*/appdata
ls -la /mnt/disk*/system
(Both should return no files found or empty directories).
5. Lock Shares to Cache Only
- On both
appdataandsystemshares, set Secondary storage to None (ensuring they remain strictly on the SSD cache). - Go to Settings -> Docker -> Set Enable Docker to
Yes-> Click Apply. - Verify containers start and run normally from the SSD cache.
Phase 2: Configure Ubiquiti UniFi UNAS Pro - "UNAS-Pro" (Hardware, RAID & NFS)
1. Network & Port Configuration
- Connect the UNAS Pro via its 10G SFP+ port to your switch (or direct to Unraid with an SFP+ DAC cable).
- In UniFi Network Application:
- Navigate to UniFi Devices -> Select the switch / UNAS Pro (UNAS-Pro).
- If using a DAC cable, set the SFP+ port profile speed explicitly to 10 Gbps FDX (rather than Auto-Negotiate, which can cause link flapping on some SFP+ transceivers).
- Assign the Static IP:
10.0.0.20(or set a fixed DHCP reservation).
- MTU Setting: Leave at standard 1500 unless you have configured and tested end-to-end Jumbo Frames (MTU 9000) across your switch, Unraid NIC, and UNAS. Mismatched MTUs will stall large file writes.
2. Storage Pool & RAID Level Selection
- Open the web interface:
https://10.0.0.20or launch it via unifi.ui.com. - Open the Storage / UniFi Drive application.
- Insert all 7x 18TB HDDs into drive bays 1 through 7.
- Click Create Storage Pool:
- Capacity: ~90TB usable (5 data disks + 2 parity disks).
- Allow the storage pool to initialize and sync.
Recommended RAID Type: RAID 6 (Dual Parity).
[!WARNING]
With 7x 18TB drives, rebuild times can take 36 to 60+ hours. On RAID 5 (single parity), an Unrecoverable Read Error (URE) or a second drive dropping during rebuild results in complete catastrophic data loss. RAID 6 tolerates 2 drive failures and is strongly recommended for high-capacity 18TB disks.
3. Create Shared Folders in UniFi Drive
- In the Drive app, go to Shares (or Shared Folders) -> Click Create New Share.
- Name the share:
plex. - Under protocols, toggle ON the NFS service (you can also enable SMB if you want Windows/Mac client access).
4. Configure NFS Export Rules & Security
Click on the newly created plex share and configure the NFS Access Settings:
| Setting | Recommended Value | Why It Is Critical |
|---|---|---|
| Allowed Client / Host | 10.0.0.10 (Unraid IP) |
Restricts access solely to Unraid rather than exposing to the entire LAN (*). |
| Privilege / Access | Read / Write (rw) |
Grants Unraid full read/write access. |
| Root Squash / User Mapping | Isolated Mode (no_root_squash) |
Mandatory for Unraid. If root squash is active, root rsync jobs get remapped to nobody (UID 65534), breaking file ownership. |
| Write Mode | async (during migration) sync (production) |
Setting async speeds up initial multi-terabyte rsync transfers over 10GbE. Switch back to sync once migration completes for power-loss safety. |
| Subtree Checking | Disabled (no_subtree_check) |
Prevents subtle timeout errors when transferring deep nested folder structures. |
- Note down the full NFS export path shown in the UniFi UI (e.g.
/plexor/var/nfs/shared/plex).
Phase 3: Mount UNAS Pro NFS on Unraid & Pre-flight Testing
1. Mount via Unassigned Devices Plugin
- On Unraid (
10.0.0.10), go to the Main tab -> scroll down to Unassigned Devices. - Click Add Remote SMB/NFS Share.
- Select NFS, enter
10.0.0.20, and click Search. - Select the
plexshare from the dropdown list. - Set Mount Point Name to:
nas_plex. - Set Automount to Yes.
Click Mount. The mount path will be:
/mnt/remotes/nas_plex
2. Pre-Flight Permission & Write Verification
Open the Unraid Terminal and run this quick sanity test:
# Verify export visibility on UNAS-Pro
showmount -e 10.0.0.20

# Create a test file inside the remote mount
touch /mnt/remotes/nas_plex/perm_test.tmp

# Verify file ownership (should show root:root without being squashed to nobody)
ls -la /mnt/remotes/nas_plex/perm_test.tmp

# Clean up test file
rm /mnt/remotes/nas_plex/perm_test.tmp
Phase 4: Migrate Bulk Data from DAS to UNAS Pro
Run the bulk data transfer inside a persistent terminal session (tmux or screen) so closing your browser won't abort the transfer.
# Start a detached tmux session
tmux new -s unas_migration

# Transfer Plex bulk share contents from DAS to UNAS Pro (UNAS-Pro)
rsync -avhP --numeric-ids /mnt/user/plex/ /mnt/remotes/nas_plex/
Flags breakdown:
-a(Archive): Preserves symlinks, permissions, timestamps, owner, and group.-v: Verbose output.-h: Human-readable size formatting.-P: Displays progress bar and resumes interrupted transfers.--numeric-ids: Prevents UID/GID mapping translation issues.
(To detach: press Ctrl+B, then D. To reattach later: tmux attach -t unas_migration).
Final Catch-Up Delta Sync
Before switching mounts, run a final pass to catch any modified files:
rsync -avhP --delete --numeric-ids /mnt/user/plex/ /mnt/remotes/nas_plex/
Phase 5: Repath Docker Containers to NFS Storage
Now that bulk media/data is on the UNAS Pro (nas_plex):
[!TIP]Critical Plex Safety Rule: Disable "Empty Trash Automatically"
Before repathing or starting Plex with new NFS mounts, ensure Plex does not purge metadata if it encounters a temporarily missing path:Open Plex Web -> Settings (Wrench) -> Library (under Server settings).Uncheck "Empty trash automatically after every scan".Click Save Changes.
(With this unchecked, even if Plex ever boots while an NFS mount is disconnected or empty, it will display a red trash icon rather than permanently wiping your watch histories, intro markers, and posters).
- Option A (Container Mapping Update - Recommended):
- Prevent Premature Autostart: In the Unraid Docker tab, ensure the Autostart toggle for Plex is set to OFF until the new paths are mapped and verified.
- Edit container templates (e.g. Plex, Jellyfin, Sonarr, Radarr, qBittorrent):
- Click container icon -> Edit.
- Update the Host Path for media/downloads from
/mnt/user/plexto/mnt/remotes/nas_plex. - Keep the
/configpath pointing to/mnt/user/appdata/...(which is now strictly on the local SSD cache). - Click Apply to recreate and start the container directly on the NFS mount.
- Once media playback is verified, toggle Autostart back to ON.
- Add this to a script in the User Scripts plugin set to run at At Startup of Array.
To avoid editing every container template, bind-mount the remote NFS share back to the expected local share path:
mount --bind /mnt/remotes/nas_plex /mnt/user/plex
Option B (Bind Mount via User Scripts):
[!WARNING]
Array Shutdown Caveat: An active bind mount inside/mnt/user/will prevent Unraid from stopping the array, causing it to hang onRetry unmounting user share(s).
If using Option B, you must also add an unmount command to run At Stopping of Array in User Scripts (or run it manually before stopping):
Phase 6: Decommission & Repurpose the Old USB4 DAS Drives
[!CAUTION]
Do NOT wipe or reformat the DAS drives until you have tested your Docker containers and data access for at least 24-48 hours.
- Release Locks Before Stopping Array:
- Close or change directories in any active terminals/tmux sessions (run
cd /rootortmux kill-session -t unas_migration). - (Troubleshooting: If Unraid still displays
Retry unmounting user share(s), runfuser -km /mnt/userto force-kill remaining locks).
- Close or change directories in any active terminals/tmux sessions (run
- Stop the Unraid Array (Main -> Array Operation -> Stop).
- Go to Tools -> New Config:
- Preserve Pools (so your SSD Cache pool remains completely untouched).
- Unassign all old USB4 DAS drives from the Array slots.
- Apply the configuration.
- The old drives can now be pulled out, wiped via preclear, or repurposed elsewhere.
If you chose Option B (Bind Mount from Phase 5), unmount it now:
umount -l /mnt/user/plex
Verify all array disks are clean:
df -h | grep /mnt/disk
Phase 7: Setup New DAS Drives & Revert/Restore Mover Configuration
Once the old drives are removed and your new replacement drives are slotted into the USB4 DAS:
1. Assign & Format New Drives in Unraid
- Navigate to the Main tab in Unraid GUI.
- Under Array Devices, assign the new DAS drives to your data slots (Disk 1, Disk 2, etc.) and optional Parity slot.
- Start the Array.
- Under Array Operations, check the box "Yes, I want to do this" next to Format Unformatted Disks (default filesystem: XFS or ZFS).
- Click Format. If a parity drive was assigned, Unraid will begin the background parity sync.
2. Reconfigure Mover Workflow (Two Scenarios)
Scenario A: Standard Cache-to-Array Ingest for New Shares (Recommended)
Use your SSD Cache as a high-speed write buffer for downloads/data, with Mover flushing data to the new mechanical DAS array disks on schedule.
- For New or Existing Data/Download Shares:
- Go to Shares -> Click share name (e.g.
downloads,media):- Primary storage:
cache - Secondary storage:
Array - Mover action:
Cache -> Array - Click Apply.
- Primary storage:
- Go to Shares -> Click share name (e.g.
(Leave appdata set to Primary: cache, Secondary: None so container databases retain SSD performance and avoid mechanical drive spin-up/latency).
Scenario B: Moving appdata Back to the New Array (True "Undo")
If you intentionally want appdata and system moved off the cache and back onto the new DAS array disks:
- Stop Docker and VM Services:
- Settings -> Docker -> Set Enable Docker to
No-> Apply. - Settings -> VM Manager -> Set Enable VMs to
No-> Apply.
- Settings -> Docker -> Set Enable Docker to
- Reconfigure Share Mover Direction:
- Go to Shares -> Click appdata:
- Primary storage:
cache - Secondary storage:
Array - Mover action:
Cache -> Array(Reverses the evacuation). - Click Apply.
- Primary storage:
- Repeat for
systemshare if desired.
- Go to Shares -> Click appdata:
- Run Mover:
- Restart Docker Service:
- Settings -> Docker -> Set Enable Docker to
Yes-> Apply.
- Settings -> Docker -> Set Enable Docker to
Verify Files Moved to Array:
ls -la /mnt/disk*/appdata
(Ensure files now populate /mnt/disk1/appdata, etc.)
Go to Main tab -> click Move, or run via terminal:
mover start
tail -f /var/log/syslog | grep -i mover
3. Verify Mover Schedule
- Go to Settings -> Scheduler.
- Under Mover Settings, confirm your desired schedule (e.g., Daily at 3:00 AM).
- If using the Mover Tuning plugin, review rules (e.g. "Only move if cache exceeds 80%") to align with your new disk sizes.
4. Rollback Plan
If any issue arises during migration:
- Since the original DAS drives remain untouched until Phase 6, all original data remains intact.
- In Docker settings, point media paths back to
/mnt/user/plex. - If appdata needs to be restored from backup, use the Appdata.Backup restore tool.


